
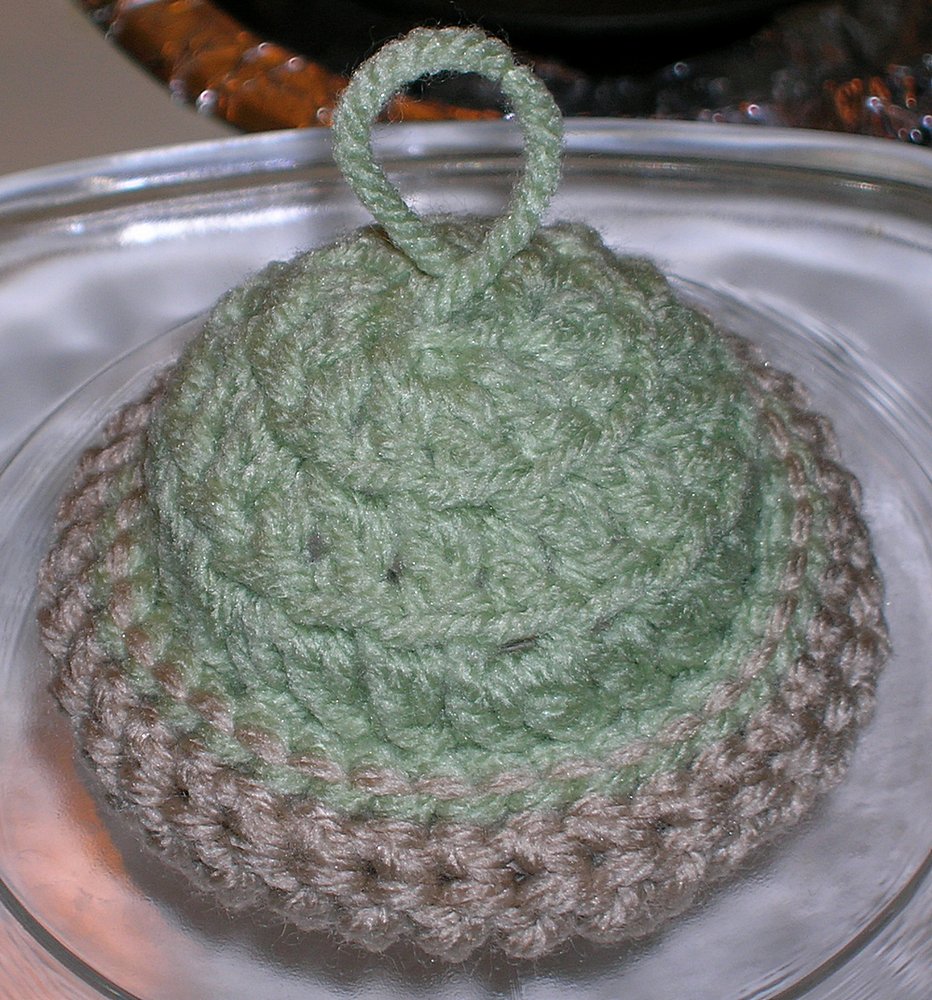
 Ack! Help! I've been bitten by the pattern-posting bug! It was so much fun posting a pattern yesterday, that I was unable to rest (or sort, or pack, aarrgghh!) until I had finally figured out and written down the pattern for the fabulous Lid Hat. This is a little item that my sister found in a great aunt's things and has been used to the point of falling apart. She enlisted me to reverse engineer the darling hat in order to make more for her and her daughters (again with the familial dependence upon me for kitchen needs). It's a great little item -- when cooking with a lid, you put the little hat on the lid handle and leave it there so any time you need to lift the lid, you can do so without burning your fingers. And they're cute! And they're great for using up scraps. They only take a few yards of yarn.
I've modified the original pattern a bit, mostly to make the hat larger -- my standard is the lid of a basic piece of Corning Ware. This size works just right. You can modify the pattern so the hat will best fit whatever lid you most use (change hook size, eliminate or add a round, etc.). Here goes:
Materials:
Small amounts (a few yards) of two colors worsted weight yarn, a Main Color (MC) and a Contrasting Color (CC). (I love using cotton in the kitchen, but it does not work well for this project. A springier yarn is needed to better stretch and conform to the handle's shape. I use acrylic scraps, but wool would be even better.)
Crochet hook, size H
Yarn needle
Directions:
Rnd 1 - With MC, ch 2. 6 sc in second ch from hook. Join with sl st in
first sc.
**From this point on, all stitches will be worked in the back loop only.**
Rnd 2 - ch 3 (counts as first dc now and throughout), dc in same
st, (2 dc in next st) around, join with sl st in top of ch 3. (12
dc made).
Rnd 3 - ch 3, 2 dc in next dc, (dc in next dc, 2 dc in next dc)
around, join w/ sl in top of ch3. (18 dc made).
Rnd 4 - ch 3, dc in next dc, 2 dc in next dc, (dc in next 2 dc, 2 dc
in next dc) around, join with sl st in top of ch 3. (24 dc made). Fasten off.
Rnd 5 - Join CC with a sl st to top of ch 3 from previous rnd. Ch 3, dc
in next 2 dc, 2 dc in next dc, (dc in next 3 dc, 2 dc in next dc)
around, join with sl st in top of ch 3. (30 dc made).
Rnd 6 - ch 3, dc in next 3 dc, 2 dc in next dc, (dc in next 4 dc, 2
dc in next dc) around, join with sl st in top of ch 3. (36 dc made).
Rnd 7 - ch 1 (does not count as first sc), sc in same st, sc in each
st around, join with sl st in top of first sc. (36 sc made). Fasten off.
Rnd 8 - Join MC with sl st to first sc of previous rnd. sl st in each st
around, join with sl st in first sl st. (36 sl st made). Fasten off.
Fold the last few rows toward the outside to make the "brim" (once you start folding it will kind of naturally fall into place). It should lay so that the "crown" of the hat is only MC and the "brim" is only CC. Click on photo for frighteningly large view that should illustrate this nicely, if scarily. You may have to lean back a little.
Using a yarn needle, thread the tail from beginning chain through
the hole formed by the first rnd to the right side. Thread the tail
back through the same hole to the back side, leaving a loop. Tie the
yarn to the back side and weave in end. Weave in all other ends.
Now your lids won't have to run around nekkid! Whew!
1 comment:
Awesome! Since you like writing patterns, maybe I could send you my chicken scratch and you could type it up for me. LOL Just kiddin'!
Post a Comment